And_droooooooid
Android
Android Market renamed to Google Play.
Google’s Android Market started as standalone app storenow encompasses e-books, music, videos,
and will now be rebranded/renamed as: Google Play.
...renting movies, purchasing music, or skimming e-books from Google
does not require actually owning an Android device.
Developer
$25 developer cost:https://developer.android.com/distribute/googleplay/developer-console.html
setup QR code to app
http://goqr.me/#
http://en.knicket.com/android/
http://www.appszoom.com/search/?q=mille15&platform=1&ref=search-box
Tips/Tricks
http://www.greenbot.com/Google Sign-In
Add "Google Sign-In" to Your Android App
allows users into your apps quickly and securely,
using a registration system they already use and trust...
their Google account!
In your sign-in activity's onCreate() callback:
// Build GoogleApiClient to request access to the basic user profile
mGoogleApiClient = new GoogleApiClient.Builder(this)
.addConnectionCallbacks(this)
.addOnConnectionFailedListener(this)
.addApi(Plus.API)
.addScope(new Scope(Scopes.PROFILE))
.build();
Then, in the activity's onStart() callback:
// Connect GoogleApiClient
mGoogleApiClient.connect()
make a reminder Google search page
Type "remind me..." u see widget for creating the reminder.Select when/where, then click Remind me on Google Now.
If you put the date or time in your original text, it will be filled out for you already in the widget.
You can include locations too, provided Google already knows about them.
If it knows your "work" address, you can say
"remind me when I leave work to buy diapers" and get a location-based reminder.
GoogleNow delivers it on phone via "Google Search" app.
On/Off Switch
<Switch
android:id="@+id/on_off_switch"
android:layout_width="wrap_content"
android:layout_height="wrap_content"
android:textOff="OFF"
android:textOn="ON"/>
in activity:
Switch onOffSwitch=(Switch)findViewById(R.id.on_off_switch);
onOffSwitch.setOnCheckedChangeListener(new CompoundButton.OnCheckedChangeListener(){
public void onCheckedChanged(CompoundButton buttonView, boolean isChecked) {
//isChecked=true ...if switch is On
Log.v("Switch State=", ""+isChecked);
}
});
Get position/orientation/tilt
package com.infodoc.doc.tilt;

import android.app.Activity;
import android.content.Context;
import android.hardware.Sensor;
import android.hardware.SensorEvent;
import android.hardware.SensorEventListener;
import android.hardware.SensorManager;
import android.os.Bundle;
import android.util.Log;
import android.widget.TextView;

/* notice activity is also a listener */public class MainActivity extends Activity implements SensorEventListener {
    private static final String TAG = "MainActivity";
    private TextView tiltRoll, tiltPitch, tiltAz;
    private SensorManager sensorManager;
    private Sensor accelerometer;
    private Sensor magnetometer;
    private float[] mGravityArray;
    private float[] mGeomagneticArray;

    protected void onCreate(Bundle savedInstanceState){super.onCreate(savedInstanceState);
        setContentView(R.layout.activity_main);
        tiltRoll =(TextView)findViewById(R.id.TEXTVIEW_ROLL);
        tiltPitch =(TextView)findViewById(R.id.TEXTVIEW_PITCH);
        tiltAz =(TextView)findViewById(R.id.TEXTVIEW_AZ);
        sensorManager = (SensorManager)getSystemService(Context.SENSOR_SERVICE);
        accelerometer = sensorManager.getDefaultSensor(Sensor.TYPE_ACCELEROMETER);
        magnetometer = sensorManager.getDefaultSensor(Sensor.TYPE_MAGNETIC_FIELD);
    }
    protected void onResume(){super.onResume();
        sensorManager.registerListener(this, accelerometer, SensorManager.SENSOR_DELAY_UI);
        sensorManager.registerListener(this, magnetometer, SensorManager.SENSOR_DELAY_UI);
    }
    protected void onPause(){super.onPause();
        sensorManager.unregisterListener(this);
    }
    public void onAccuracyChanged(Sensor sensor, int accuracy) {}
    /** Convert degrees to absolute tilt val 0-100 */    private int degreesToPower(int degrees){
        if (degrees < -90) degrees = -90; // Tilted back towards user        else if (degrees > 0) degrees = 0; // Tilted forward past 0 deg
        degrees *= -1; // Normalize to positive val        degrees = 90-degrees; // Invert from 90-0 to 0-90        float degFloat=degrees/90f*10f; //scale to 0-10        //degFloat=degFloat/10;        return (int)degFloat;
    }

    public void onSensorChanged(SensorEvent event) {
        if (event.values == null) return;
        int sensorType = event.sensor.getType();
        switch (sensorType) {
            case Sensor.TYPE_ACCELEROMETER:  mGravityArray=event.values; break;
            case Sensor.TYPE_MAGNETIC_FIELD: mGeomagneticArray=event.values; break;
            default: Log.w(TAG, "Unknown sensor type " + sensorType); return;
        }
        if (mGravityArray == null) return;
        if (mGeomagneticArray == null) return;

        float R[] = new float[9];
        if (!SensorManager.getRotationMatrix(R, null, mGravityArray, mGeomagneticArray)) return;

        float orientation[] = new float[9];
        SensorManager.getOrientation(R, orientation); // azimuth, pitch and roll        float roll = orientation[2];
        int rollDeg = (int)Math.round(Math.toDegrees(roll));
        int rollPower = degreesToPower(rollDeg);
        tiltRoll.setText("Roll: "+String.valueOf(rollPower));

        float pitch = orientation[1];
        int pitchDeg = (int)Math.round(Math.toDegrees(pitch));
        int pitchPower = degreesToPower(pitchDeg);
        tiltPitch.setText("Pitch: "+String.valueOf(pitchPower));

        float az = orientation[0];
        int azDeg = (int)Math.round(Math.toDegrees(az));
        int azPower = degreesToPower(azDeg);
        tiltAz.setText("AZ (you gotta move):"+String.valueOf(azPower)+" deg:"+String.valueOf(azDeg));
    }
}
Keep screen on
getWindow().addFlags(WindowManager.LayoutParams.FLAG_KEEP_SCREEN_ON);
Start new Activity from NON-UI thread!
StartActFromThread
Create the act2.xml as desired
create the Act2.java activity
...w/setContentView(R.layout.act2)
MainAct.java share its public context
Define the app in the manifest:
<manifest...
<application...
<activity android:name=".Act2"/>
In your thread
(Note: FLAG_ACTIVITY_NEW_TASK was not needed w/shared main context: )
public class ButtonClickListener1 implements View.OnClickListener {
public void onClick(View v){
Thread t1=new Thread(new Runnable(){
@Override
public void run(){
Message msg=h1.obtainMessage();
msg.obj="bla";
h1.sendMessage(msg);
}
Handler h1=new Handler(){
@Override
public void handleMessage(Message msg) {
super.handleMessage(msg);
MainActivity.textV1.append("appending msg:"+(String)msg.obj);
Intent myIntent = new Intent(MainActivity.context, Act2.class);
//myIntent.setFlags(Intent.FLAG_ACTIVITY_NEW_TASK);
MainActivity.context.startActivity(myIntent);
}
};
});
t1.start();
}
}
ListViews!
Simple Boring Single String ListView
//Craaaaaazy ListViews need ListItems plugged into ArrayAdapters! Sheeesh!
//fortunately, Android has builtIn simple single String ListItem Layouts for ListView//android.R.layout.simple_list_item_1 with the built in TextView android.R.id.text1
ArrayAdapter<String> devArrayAdapter=new ArrayAdapter<String>(this, android.R.layout.simple_list_item_1, android.R.id.text1);
devArrayAdapter.add("item1");
devArrayAdapter.add("item2");
((ListView)findViewById(R.id.DocMainDevListView)).newDevicesListView.setAdapter(devArrayAdapter);
Cool/Awesome ListView!
- Create row.xml and similar pojo rowBean.
- Create simple ArrayAdapter<rowBean> ...in constructor (optionally populate/add beans) getView pulls 1 row via ...(RowBean)getItem(position);
- Add blank verticle mainListView to main_act.xml
- In Main act, link the mainListView to rowBean adapter (and optionally populate/add beans)

package com.example.mdockery.complexlist;
import android.content.Context;
import android.view.LayoutInflater;
import android.view.View;
import android.view.ViewGroup;
import android.widget.ArrayAdapter;
import android.widget.ImageView;
import android.widget.TextView;

import java.util.List;
public class RowAdapter extends ArrayAdapter<RowBean> {
    Context callerContext;
    public RowAdapter(Context context, List<RowBean> beans) {
        super(context, -1, beans);
        this.callerContext=context;
        beans.add(new RowBean("added from adapter constructor","ad","ad"));
    }
    public View getView(int position, View convertView, ViewGroup parent) {
 LayoutInflater inflater = (LayoutInflater) callerContext.getSystemService(Context.LAYOUT_INFLATER_SERVICE);
        View rowView = inflater.inflate(R.layout.row, parent, false);
        RowBean bean=(RowBean)this.getItem(position);
 ((TextView) rowView.findViewById(R.id.rowTxt1)).setText("orig_createdVal is: "+bean.getTxt1().trim());
 ((TextView) rowView.findViewById(R.id.rowTxt2)).setText("pos:" + position + " arysize:" + this.getCount());
        ImageView imageView = (ImageView) rowView.findViewById(R.id.rowImg);
        imageView.setImageResource(R.drawable.star);
        return rowView;
    }
}
row_layout.xml …defines the Cool/Awesome Row
<LinearLayout
xmlns:android="http://schemas.android.com/apk/res/android"
xmlns:tools="http://schemas.android.com/tools"
android:layout_width="match_parent"
android:layout_height="match_parent"
android:orientation="horizontal">
<ImageView
android:id="@+id/rowImage"
android:layout_width="20dp"
android:layout_height="20dp"
android:layout_marginLeft="20dp"
android:layout_marginTop="20dp"
android:background="@drawable/star"/>
<TextView
android:id="@+id/rowDevName"
android:layout_width="wrap_content"
android:layout_height="wrap_content"
android:textSize="30sp"
android:textStyle="bold"
android:padding="10dp"
android:text="Prev Paired BT Devs"
/>
</LinearLayout>
activity_main.xml is simply a vertically oriented LinearLayout w/empty ListView
public class
MainActivity extends
Activity {
protected void onCreate(Bundle savedInstanceState) {
super.onCreate(savedInstanceState);
setContentView(R.layout.activity_main);
String[] pairedDevs =
{"dev1", "dev2"};
//link
main/empty listView xml element to adapter
ListAdapter devListAdapter=new
DevListAdapter(this,pairedDevs);
ListView devListView=(ListView)findViewById(R.id.devListView);
devListView.setAdapter(devListAdapter);
//clicker
devListView.setOnItemClickListener(new AdapterView.OnItemClickListener()
{
public void
onItemClick(AdapterView<?> adapterView, View clickedView, int i, long l)
{
Toast.makeText(MainActivity.this,
"Connecting", Toast.LENGTH_SHORT).show();
TextView rowDevName=(TextView)clickedView.findViewById(R.id.rowDevName);
rowDevName.append(" is
smiling"); //
ImageView devRowImage=(ImageView)
clickedView.findViewById(R.id.rowImage);
devRowImage.setBackgroundResource(R.drawable.smile); //make row smile
}
});
}
...
Themes/Styles
Can be created/applied in manifest @ app or activity level ...adroid:theme="@style/DockeryTheme"
or can be applied to specific components such as layouts or TextViews
You can use an existing theme, and pimp/tweak it by specifying it as the "parent" theme
and then customize the parts/colors you wanna change.

App icon
AndroidManifest.xml <application> android:icon
If @drawable/ic_launcher, then icon is ic_launcher.png
see
res/drawable-mdpi
res/drawable-hdpi
ex:
...res\mipmap-xhdpi\ic_launcher.png
Full Path:
C:\Program Files\Android\Android Studio\plugins\android\lib\templates\gradle-projects\NewAndroidModule\root\res\mipmap-xhdpi\ic_launcher.png
File>New>Image Asset
it auto gens 4 pixel-sizes for use as a launcher-icon (freaking cool)
<?xml version="1.0" encoding="utf-8"?>
<manifest xmlns:android="http://schemas.android.com/apk/res/android"
package="com.infodoc.doc.bt_doc" >
<application
android:allowBackup="true"
android:icon="@mipmap/bt_icon"
android:label="@string/app_name"
android:theme="@style/AppTheme" >
Child/Parent Activities/Screens
app/manifests/AndroidManifest.xml
<?xml version="1.0" encoding="utf-8"?><manifest xmlns:android="http://schemas.android.com/apk/res/android"    package="com.infodoc.doc.childactivity1" >

    <application        android:allowBackup="true"        android:icon="@mipmap/ic_launcher"        android:label="@string/app_name"        android:theme="@style/AppTheme" >
        <activity  android:name=".MainActivity"            android:label="@string/app_name" >
            <intent-filter>
                <action android:name="android.intent.action.MAIN" />
                <category android:name="android.intent.category.LAUNCHER" />
            </intent-filter>
        </activity>
<activity
android:name=".Act2" android:label="Act2"
            android:parentActivityName=".MainActivity"/>
    </application>
</manifest>
res/layout/act2.xml
(Note: layout xml files MUST be lower case!!!)
<RelativeLayout xmlns:android="http://schemas.android.com/apk/res/android" xmlns:tools="http://schemas.android.com/tools" android:layout_width="match_parent" android:layout_height="match_parent" android:paddingLeft="@dimen/activity_horizontal_margin" android:paddingRight="@dimen/activity_horizontal_margin" android:paddingTop="@dimen/activity_vertical_margin" android:paddingBottom="@dimen/activity_vertical_margin" tools:context=".MainActivity"> <TextView android:text="Act2" android:layout_width="wrap_content" android:layout_height="wrap_content" /> </RelativeLayout> public class Act2 extends Activity { @Override protected void onCreate(Bundle savedInstanceState) { super.onCreate(savedInstanceState); setContentView(R.layout.act2); } }Main Activitypackage com.infodoc.doc.childactivity1; import android.app.Activity; import android.content.Intent; import android.os.Bundle; import android.view.Menu; import android.view.MenuItem; public class MainActivity extends Activity { protected void onCreate(Bundle savedInstanceState) { super.onCreate(savedInstanceState); setContentView(R.layout.activity_main); } ... public boolean onOptionsItemSelected(MenuItem item) { int id = item.getItemId(); if (id == R.id.action_settings) { Intent myIntent = new Intent(this, Act2.class); //myIntent.putExtra("key", value); //Optional parameters this.startActivity(myIntent); //open another activity from this activity return true; } return super.onOptionsItemSelected(item); } }
The NEW ActionBar
needs min SDK v11+ (aka android 3.0 honeycomb)
Gradle Scripts/build.gradle (Module: app)
...and remove the appCompat dependency via app module properties
or via removing the appcompat line in the build.gradle file:then click tools --> android --> Sync with Gradledependencies { compile fileTree(dir: 'libs', include: ['*.jar']) compile 'com.android.support:appcompat-v7:22.1.1'}
res/menu/menu.main.xmlremove the res-auto line:<menu xmlns:android="http://schemas.android.com/apk/res/android" xmlns:app="http://schemas.android.com/apk/res-auto" xmlns:tools="http://schemas.android.com/tools" tools:context=".MainActivity"> <item android:id="@+id/CoolItem1" android:title="CoolItem1" android:orderInCategory="100" android:showAsAction="never" /> <item android:id="@+id/CoolItem2" android:title="CoolItem2" android:orderInCategory="100" android:showAsAction="ifRoom" /> </menu>Use newer android:showAsAction namespace...instead of older app:showAsActionres/values/styles.xml
remove old references to old app theme(s)
...replace with any HOLO such as
<resources>
<style name="AppTheme" parent="android:Theme.Holo"/>
</resources>
or simply "AppTheme" as in below:
<resources> <style name="AppTheme" parent="AppTheme"/> </resources>/res/layout/activity_main.xml
the TextView gets updated upon ActionBar Item click
<RelativeLayout xmlns:android="http://schemas.android.com/apk/res/android" xmlns:tools="http://schemas.android.com/tools" android:layout_width="match_parent" android:layout_height="match_parent" android:paddingLeft="@dimen/activity_horizontal_margin" android:paddingRight="@dimen/activity_horizontal_margin" android:paddingTop="@dimen/activity_vertical_margin" android:paddingBottom="@dimen/activity_vertical_margin" tools:context=".MainActivity">
</RelativeLayout>
</RelativeLayout>
<TextView android:id="@+id/helloText"
android:text="@string/hello_world" android:layout_width="wrap_content"
android:layout_height="wrap_content" />
you may need to rebuild or clean your projectjava/Activity/MainActivityRemove the old import of v7 AppCompat lib:import android.support.v7.app.ActionBarActivity; //OLDReplace with new importimport android.app.Activity; //NEWsee update of TextView upon ActionBar Menu Item clickpublic class MainActivity extends Activity { @Override protected void onCreate(Bundle savedInstanceState) { super.onCreate(savedInstanceState); setContentView(R.layout.activity_main); getActionBar().show(); } @Override public boolean onCreateOptionsMenu(Menu menu) { getMenuInflater().inflate(R.menu.menu_main, menu); return true; } @Overridepublic boolean onOptionsItemSelected(MenuItem item) { int id = item.getItemId(); if (id == R.id.CoolItem1) { ((TextView)findViewById(R.id.helloText)).append("x"); return true; } return super.onOptionsItemSelected(item); } }app/manifests/AndroidManifest.xmlsdk min NOT really needed for the NEW ActionBar:<?xml version="1.0" encoding="utf-8"?><manifest xmlns:android="http://schemas.android.com/apk/res/android" package="com.infodoc.doc.topbar1" > <uses-sdk android:targetSdkVersion="11"/> <!-- not really needed for NEW ActionBar -->...but again, you do NEED to target sdk11+ (aka: v3.0+)
Contexts
App.............:
a singleton instance running in your app process. ...u always get the same instance!
getApplication() from Activity or Service,
getApplicationContext() from any other object that inherits from Context.
Activity– via ContextWrapper API,
Each Activity & its base context are unique per-instance.
ContentProvider – is also not a Context but is given one
getContext()
if 2 apps in separate processes, creates instance representing the package
Store App Prefs for EASY persistence (easier than sql or files)
SharedPreferences (simple primitive name/val pairs)
xml files stored in
/data/data/myPkg/share-prefs
Save
SharedPreferences sp=getSharedPrefs(string, modeprivate_or_multi) //if several files
or getPrefs(int private_or_multi) //if single files
SharedPreferences.Editor ed=sp.edit();
ed.putString("coolKey1","coolVal1");
ed.commit();
Load
SharedPreferences sp=getSharedPrefs(string, modeprivate_or_multi) //if several files
or getPrefs(int private_or_multi) //if single files
SharedPreferences.getString.("coolKey1","oopsDfltVal");
ed.commit();
Common Purposes:
user settings
location caching
user's first time?
when lastUpdated
package com.infodoc.doc.threadhandleapp;
import android.content.Context;import android.content.SharedPreferences;import android.view.View;import android.widget.Toast;
public class ButtonClickListener2 implements View.OnClickListener {
    public void onClick(View v){
        SharedPreferences sp=
              MainActivity.ctx.getSharedPreferences("AppStuff", Context.MODE_PRIVATE);
        int butt2Viz=MainActivity.textArea.getVisibility();
        Toast.makeText(MainActivity.ctx,"butt2Vizizzzz:"+butt2Viz,Toast.LENGTH_LONG);
        if(butt2Viz==View.VISIBLE){
            MainActivity.textArea.append(" hiding ");
            MainActivity.textArea.setVisibility(View.INVISIBLE);
            SharedPreferences.Editor ed=sp.edit();
            ed.putString("DEV", "coolDev"); ed.commit();
        }else {
            String coolDev=sp.getString("DEV","DFLT");
            MainActivity.textArea.append(" showing "+coolDev);
            MainActivity.textArea.setVisibility(View.VISIBLE);
        }
    }
}
Consider a hidable log windows (like a TextArea)
package com.infodoc.doc.threadhandleapp;

import android.app.Activity;
import android.view.View;
import android.widget.Toast;

/** * Created by DOC on 5/27/2015. */public class ButtonClickListener2 implements View.OnClickListener {
    public void onClick(View v){
        int butt2Viz=MainActivity.textArea.getVisibility();
        Toast.makeText(MainActivity.ctx,"butt2Vizizzzz:"+butt2Viz,Toast.LENGTH_LONG);
        if(butt2Viz==View.VISIBLE){
            MainActivity.textArea.append(" hiding ");
            MainActivity.textArea.setVisibility(View.INVISIBLE);
        }else {
            MainActivity.textArea.append(" showing ");
            MainActivity.textArea.setVisibility(View.VISIBLE);
        }
    }
    void sleeper(int ms){
        try{Thread.sleep(ms);}catch (InterruptedException ie){}
    }

}
<GridLayout xmlns:android="http://schemas.android.com/apk/res/android" xmlns:tools="http://schemas.android.com/tools" android:layout_width="match_parent" android:layout_height="match_parent" android:paddingLeft="@dimen/activity_horizontal_margin" android:rowCount="6" android:columnCount="3" android:paddingRight="@dimen/activity_horizontal_margin" android:paddingTop="@dimen/activity_vertical_margin" android:paddingBottom="@dimen/activity_vertical_margin" tools:context=".MainActivity"> <TextView android:id="@+id/textHeader1" android:layout_row="0" android:layout_column="0" android:layout_width="wrap_content" android:layout_height="wrap_content" android:text="threads with handles" /> <Button android:id="@+id/butt1" android:layout_row="1" android:layout_column="1" android:text="buttOne" /> <Button android:id="@+id/butt2" android:layout_row="2" android:layout_column="2" android:text="buttTwo" /> <EditText android:id="@+id/textArea" android:layout_width="wrap_content" android:layout_height="wrap_content" android:layout_row="3" android:layout_column="0" android:layout_columnSpan="3" android:layout_rowSpan="2" android:layout_gravity="fill_horizontal" android:maxLines="5" android:scrollbars="vertical" android:background="@color/accent_material_dark" /> </GridLayout>or put in an auto ScrollView:<ScrollView android:layout_width="fill_parent" android:layout_height="wrap_content" android:scrollbars="vertical" android:fillViewport="true"> <TextView android:id="@+id/mainLogBox" android:layout_width="fill_parent" android:gravity="bottom" android:layout_gravity="fill_horizontal" android:layout_height="fill_parent" android:text="LogBox\n" android:textSize="12sp" android:textColor="@android:color/black" android:background="@android:color/holo_blue_dark" /></ScrollView>
App versioning
- AppCode is an integer
- AppVersion is a friendly text name for the version to show the user.
its good to update your version as you update your code. GooglePlay will appreciate it also as you deploy.
In newer version of android studio, simply specify the version in the file:
...\AndroidStudioProjects\MyProj\app\build.gradle
apply plugin: 'com.android.application'

android {
    compileSdkVersion 22
    buildToolsVersion "22.0.1"

    defaultConfig {
        applicationId "com.infodoc.doc.bt_doc"
        minSdkVersion 15
        targetSdkVersion 22
        versionCode 1
        versionName "1.7 No Delays"
    }
    buildTypes {
        release {
            minifyEnabled false
            proguardFiles getDefaultProguardFile('proguard-android.txt'), 'proguard-rules.pro'
        }
    }
}

dependencies {
    compile fileTree(dir: 'libs', include: ['*.jar'])
}
in older versions specify it in your AndroidManifest.xml file
AndroidStudioProjects\BT_Doc\app\build\intermediates\manifests\full\release
<?xml version="1.0" encoding="utf-8"?>
<manifest xmlns:android="http://schemas.android.com/apk/res/android"
package="com.infodoc.doc.bt_doc"
android:versionCode="1"
android:versionName="1.7 No Delays" >
<uses-sdk
android:minSdkVersion="15"
android:targetSdkVersion="22" />...
In your main activity you can pull the version like so:
AndroidStudioProjects\BT_Doc\app\src\main\java\com\infodoc\doc\bt_doc
public String getVer(){String ver="No Version.";
try {
PackageInfo pinfo = getPackageManager().getPackageInfo(getPackageName(), 0);
int versionNumber = pinfo.versionCode;
ver = +versionNumber+" ("+pinfo.versionName+")";
}catch(PackageManager.NameNotFoundException ne){logIt("Err getting ver:"+ne.getMessage());}
return ver;
}
Super Simple Thread/Runnable (w/Handler updating GUI)
<GridLayout xmlns:android="http://schemas.android.com/apk/res/android"    xmlns:tools="http://schemas.android.com/tools" android:layout_width="match_parent"    android:layout_height="match_parent" android:paddingLeft="@dimen/activity_horizontal_margin"    android:rowCount="3"    android:columnCount="3"    android:paddingRight="@dimen/activity_horizontal_margin"    android:paddingTop="@dimen/activity_vertical_margin"    android:paddingBottom="@dimen/activity_vertical_margin" tools:context=".MainActivity">

    <TextView android:id="@+id/textV1" android:layout_row="0" android:layout_column="0"
          android:text="threads with handles"/>

  <Button android:id="@+id/butt1" android:layout_row="1" android:layout_column="1" android:text="buttOne" />
  <Button android:id="@+id/butt2" android:layout_row="2" android:layout_column="2" android:text="buttTwo" />
</GridLayout>
package com.example.mdockery.threadhand1;

import android.support.v7.app.ActionBarActivity;
import android.os.Bundle;
import android.view.Menu;
import android.view.MenuItem;

import android.app.Activity;
import android.support.v7.app.ActionBarActivity;
import android.os.Bundle;
import android.view.Menu;
import android.view.MenuItem;
import android.widget.Button;
import android.widget.TextView;
import android.widget.Toast;

public class MainActivity extends Activity {
    public static TextView textV1;
    @Override    protected void onCreate(Bundle savedInstanceState) {
        super.onCreate(savedInstanceState);
        setContentView(R.layout.activity_main);
        Toast.makeText(this,"about to set textV1 static var",Toast.LENGTH_LONG).show();
        textV1=(TextView)findViewById(R.id.textV1);
        Toast.makeText(this,"butt1",Toast.LENGTH_LONG).show();
        Button butt1=(Button)findViewById(R.id.butt1);
        Toast.makeText(this,"butt1lis",Toast.LENGTH_LONG).show();
        butt1.setOnClickListener(new ButtonClickListener1());
        Toast.makeText(this,"butt1done",Toast.LENGTH_LONG).show();
    }
    @Override    public boolean onCreateOptionsMenu(Menu menu) {
        getMenuInflater().inflate(R.menu.menu_main, menu);
        return true;
    }
    @Override    public boolean onOptionsItemSelected(MenuItem item) {
        int id = item.getItemId();
        if (id == R.id.action_settings) return true;
        return super.onOptionsItemSelected(item);
    }
}
package com.example.mdockery.threadhand1;

        import android.os.Bundle;
        import android.os.Handler;
        import android.os.Message;
        import android.view.View;

public class ButtonClickListener1 implements View.OnClickListener {
    public void onClick(View v){
        Thread t1=new Thread(new Runnable(){
            @Override
            public void run(){
                Message msg=h1.obtainMessage();
                Bundle b=new Bundle();
                b.putString("message", "bla");
                msg.setData(b);
                h1.sendMessage(msg);
            }
            Handler h1=new Handler(){
                @Override
                public void handleMessage(Message msg) {
                    super.handleMessage(msg);
                    MainActivity.textV1.append(msg.getData().getString("message"));
                }
            };
        });
        t1.start();
    }
}
========================
Simple example
package com.infodoc.doc.bt_doc;

import android.os.Handler;
import android.os.Message;

public class Connectable implements Runnable {
    @Override    public void run(){
        String someStatus="i will finish in abuot 5 seconds...";
        Message msg; int cnt=0;
        while(!someStatus.equals("DONE")){cnt++;
            msg=h1.obtainMessage();
            msg.obj=someStatus; h1.sendMessage(msg);
            try{Thread.currentThread().sleep(5000);}catch(InterruptedException ie){ie.printStackTrace();}
            if(cnt>5) someStatus="DONE";
            msg=h1.obtainMessage();
            msg.obj=someStatus+" cnt:"+cnt; h1.sendMessage(msg);
        }
        Thread.currentThread().interrupt();
    }
    Handler h1=new Handler(){
        public void handleMessage(Message msg) {
            super.handleMessage(msg);
            MainActivity.logBox.append((String)msg.obj+"\n");
        }
    };

}

the act:
public class MainActivity extends Activity {
    static TextView logBox;
    @Override    protected void onCreate(Bundle savedInstanceState) {
        super.onCreate(savedInstanceState);
try {
    setContentView(R.layout.activity_main);
}catch (Exception e){System.out.print("errrrrrrrr:"+e);
    e.printStackTrace();}
        getActionBar().show();
        Toast.makeText(this, "Getting Bluetooth Adapter...", Toast.LENGTH_LONG).show();
        try{Thread.sleep(2000);}catch(InterruptedException ie){}
        this.logBox=(TextView)findViewById(R.id.logBox);

        Button logButt=(Button)findViewById(R.id.buttConn);
        logButt.setOnClickListener(
           new ButtonClickListener1() {
               public void onClick(View v) {
                   new Thread(new Connectable()).start();
               }
           }
        );
        //logButt.setOnClickListener(new ButtonClickListener1());
        ArrayAdapter<String> devArrayAdapter=new ArrayAdapter<String>(this, android.R.layout.simple_list_item_1, android.R.id.text1);
Global/Share app variables
<?xml version="1.0" encoding="utf-8"?>
<manifest xmlns:android="http://schemas.android.com/apk/res/android"
package="com.androidexample.globalvariable"
android:versionCode="1" android:versionName="1.0" >
<uses-sdk android:minSdkVersion="8" android:targetSdkVersion="9" />
<application
android:name="com.androidexample.globalvariable.GlobalClass"
android:allowBackup="true"
android:icon="@drawable/ic_launcher"
android:label="@string/app_name"
android:theme="@style/AppTheme" >
<activity
android:name="com.androidexample.globalvariable.FirstScreen"
android:label="@string/app_name" >
<intent-filter>
<action android:name="android.intent.action.MAIN" />
<category android:name="android.intent.category.LAUNCHER" />
</intent-filter>
</activity>
<activity android:name=".SecondScreen" ></activity>
</application>
</manifest>
public class FirstScreen extends Activity {
@Override
protected void onCreate(Bundle savedInstanceState) {
super.onCreate(savedInstanceState);
setContentView(R.layout.firstscreen);
final Button secondBtn = (Button) findViewById(R.id.second);
final GlobalClass globalVariable = (GlobalClass) getApplicationContext();
globalVariable.setName("Android Example context variable");
globalVariable.setEmail("xxxxxx@aaaa.com");
secondBtn.setOnClickListener(new OnClickListener() {
public void onClick(View v) {
Intent i = new Intent(getBaseContext(), SecondScreen.class);
startActivity(i);
}
});
}
}
public class SecondScreen extends Activity {
@Override
public void onCreate(Bundle savedInstanceState) {
super.onCreate(savedInstanceState);
setContentView(R.layout.secondscreen);
TextView showGlobal = (TextView) findViewById(R.id.showGlobal);
final Button thirdBtn = (Button) findViewById(R.id.third);
final GlobalClass globalVariable = (GlobalClass) getApplicationContext();
final String name = globalVariable.getName();
final String email = globalVariable.getEmail();
String showString = "Name : "+name+" Email : "+email;
showGlobal.setText(showString);
}
@Override
protected void onDestroy() {super.onDestroy();}
}
Notes on Threading
-Do NOT update the UI toolkit directly outside the main/UI thread
-See handlers and ascyntasks
View.post(runnable) is available via View which sometimes will not have access to an Activity
Activity.runOnUiThread(runnable) is available via Activity which sometimes will not have access to a View
if not on UI thread, both call Handler#post(Runnable) ...posting the runnable on the queue
however
if on Ui thread, Activity#runOnUiThread calls the run method directly,
Also
AsyncTask provides convenient background processing
without worrying about threads, message loops etc).
via callback methods
and allows UI updating
However, it is important to note that when using AsyncTask,
a developer is submitting to its limitations, which resulted
because of the design decisions that the author of the class took.
...limit to the number of jobs that can be scheduled using AsyncTasks.
Handler is more transparent of the two
and probably gives you more freedom;
so if you want more control on things you would choose Handler otherwise AsynTask will work just fine.
use AsyncTask for 1-time work, ex: download data and show on UI
use Handler for multiple repeated tasks, (downloading multiple thumbnails displayed in ImageViews)
Fragooooooooooooos!
A
Fragment represents a behavior or a portion of user interface in anActivity. You can combine multiple fragments in a single activity to build a multi-pane UI and reuse a fragment in multiple activities. You can think of a fragment as a modular section of an activity, which has its own lifecycle, receives its own input events, and which you can add or remove while the activity is running (sort of like a "sub activity" that you can reuse in different activities).
A fragment must always be embedded in an activity and the fragment's lifecycle is directly affected by the host activity's lifecycle.
For example, when the activity is paused, so are all fragments in it, and when the activity is destroyed, so are all fragments
Fragments are used in the master/detail flow
android.support.v4.app.Fragment is the Fragment class in the android support library, which is a compatibility package that allows you to use some of the newer features of Android on older versions of Android.android.app.Fragment is the Fragment class in the native version of the Android SDK. It was introduced in Android 3 (API 11).
If you want to make your app use fragments, and want to target devices before API 11, you must use
android.support.v4.app.Fragment. However, if you're only targeting devices running API 11 or above, you can use android.app.Fragment.<FrameLayout xmlns:android="http://schemas.android.com/apk/res/android" xmlns:tools="http://schemas.android.com/tools" android:id="@+id/funitem_detail_container" android:layout_width="match_parent" android:layout_height="match_parent" tools:context=".FunItemDetailActivity" tools:ignore="MergeRootFrame" />
package com.infodoc.doc.masterdetailtestapp;
import android.os.Bundle;
import android.app.Fragment;
import android.view.LayoutInflater;
import android.view.View;
import android.view.ViewGroup;
import android.widget.TextView;
import android.widget.Toast;


import com.infodoc.doc.masterdetailtestapp.dummy.DummyContent;
/** * A fragment representing a single FunItem detail screen. */public class FunItemDetailFragment extends Fragment {
    public static final String ARG_ITEM_ID = "item_id";
    private DummyContent.DummyItem mItem;
    public FunItemDetailFragment() {    }
    @Override    public void onCreate(Bundle savedInstanceState) {
        super.onCreate(savedInstanceState);
        Toast.makeText(getActivity(),"DetailFrag onCreate",Toast.LENGTH_LONG).show();
        if (getArguments().containsKey(ARG_ITEM_ID)) {
            mItem = DummyContent.ITEM_MAP.get(getArguments().getString(ARG_ITEM_ID));
            Toast.makeText(getActivity(),"FunItemDetailFragment inside",Toast.LENGTH_LONG).show();
        }
    }
    @Override    public View onCreateView(LayoutInflater inflater, ViewGroup container, Bundle savedInstanceState) {
        Toast.makeText(getActivity(),"FunItemDetailFragment onCreateView",Toast.LENGTH_LONG).show();
        View rootView = inflater.inflate(R.layout.fragment_funitem_detail, container, false);
       if (mItem != null) {
            ((TextView) rootView.findViewById(R.id.funitem_detail)).setText(mItem.content);
        }
        return rootView;
    }
}
package com.infodoc.doc.masterdetailtestapp;

import android.app.Activity;
import android.content.Intent;
import android.os.Bundle;

import android.app.Fragment;
import android.support.v4.app.NavUtils;
import android.view.MenuItem;
import android.widget.FrameLayout;

/** * FunItem detail activity */public class FunItemDetailActivity extends Activity {
    @Override    protected void onCreate(Bundle savedInstanceState) {
        super.onCreate(savedInstanceState);
        setContentView(R.layout.activity_funitem_detail);
        int frameID=new FrameLayout(this).getId();
        getActionBar().setDisplayHomeAsUpEnabled(true); // Show Up button in action bar.        if (savedInstanceState == null) {
            Bundle arguments = new Bundle();
            arguments.putString(FunItemDetailFragment.ARG_ITEM_ID,
                    getIntent().getStringExtra(FunItemDetailFragment.ARG_ITEM_ID));
            Fragment detailFrag = new FunItemDetailFragment();
            detailFrag.setArguments(arguments);
            getFragmentManager().beginTransaction().add(frameID,detailFrag);
        }
    }
    @Override    public boolean onOptionsItemSelected(MenuItem item) {
        int id = item.getItemId();
        if (id == android.R.id.home) { // Home or Up button.            NavUtils.navigateUpTo(this, new Intent(this, FunItemListActivity.class));
            return true;
        }
        return super.onOptionsItemSelected(item);
    }
}
Android app "Launcher" Activity
which appears on the launcher page.Can be specified when adding a new activity (in studio), click "Launcher Activity". or later on via MyProjRoot\manifests\AndroidManifest.xml <intent-filter> <action android:name="android.intent.action.MAIN" /> <category android:name="android.intent.category.LAUNCHER" /> </intent-filter>
Note: Your app's AndroidManifest.xml allows >1 launcher activity (each w/intent-filter)
shows multiple icons on the homescreen
Verify launched activity = "default" via Run->DebugConfigurations, projBuildProfile, tab "Android"
Install AVD Skin
C:\Users\DOC\AppData\Local\Android\Sdk\platforms\android-22\skins
Samsung Skins
http://developer.samsung.com/technical-doc/view.do?v=T000000095
Rezzzzzzzzzzzzzzz
Consider using
spfor font sizesdipfor everything else, wheredip == dp
+----------------+----------------+---------------+-------------------------------+
| Density Bucket | Screen Display | Physical Size | Pixel Size                    |
+----------------+----------------+---------------+-------------------------------+
| ldpi           | 120 dpi        | 0.5 x 0.5 in  | 0.5 in * 120 dpi = 60x60 px   |
+----------------+----------------+---------------+-------------------------------+
| mdpi           | 160 dpi        | 0.5 x 0.5 in  | 0.5 in * 160 dpi = 80x80 px   |
+----------------+----------------+---------------+-------------------------------+
| hdpi           | 240 dpi        | 0.5 x 0.5 in  | 0.5 in * 240 dpi = 120x120 px |
+----------------+----------------+---------------+-------------------------------+
| xhdpi          | 320 dpi        | 0.5 x 0.5 in  | 0.5 in * 320 dpi = 160x160 px |
+----------------+----------------+---------------+-------------------------------+
| xxhdpi         | 480 dpi        | 0.5 x 0.5 in  | 0.5 in * 480 dpi = 240x240 px |
+----------------+----------------+---------------+-------------------------------+
+---------+-------------+---------------+-------------+--------------------+
| Density | Description | Units Per | Density | Same Physical Size |
| | | Physical Inch | Independent | On Every Screen |
+---------+-------------+---------------+-------------+--------------------+
| px | Pixels | Varies | No | No |
+---------+-------------+---------------+-------------+--------------------+
| in | Inches | 1 | Yes | Yes |
+---------+-------------+---------------+-------------+--------------------+
| mm | Millimeters | 24.5 | Yes | Yes |
+---------+-------------+---------------+-------------+--------------------+
| pt | Points | 72 | Yes | Yes |
+---------+-------------+---------------+-------------+--------------------+
| dp | Density | ~ 160 | Yes | No |
| | Independent | | | |
| | Pixels | | | |
+---------+-------------+---------------+-------------+--------------------+
| sp | Scale | ~ 160 | Yes | No |
| | Independent | | | |
| | Pixels | | | |
+---------+-------------+---------------+-------------+--------------------+
px
Pixels - corresponds to actual pixels on the screen.
Pixels - corresponds to actual pixels on the screen.
in
Inches - based on the physical size of the screen.
1 Inch = 2.54 centimeters
Inches - based on the physical size of the screen.
1 Inch = 2.54 centimeters
mm
Millimeters - based on the physical size of the screen.
Millimeters - based on the physical size of the screen.
pt
Points - 1/72 of an inch based on the physical size of the screen.
Points - 1/72 of an inch based on the physical size of the screen.
dp (sometimes called "dip")
Density-independent Pixels - an abstract unit that is based on the physical density of the screen. These units are relative to a 160 dpi screen, so one dp is one pixel on a 160 dpi screen. The ratio of dp-to-pixel will change with the screen density, but not necessarily in direct proportion. Note: The compiler accepts both "dip" and "dp", though "dp" is more consistent with "sp".
Density-independent Pixels - an abstract unit that is based on the physical density of the screen. These units are relative to a 160 dpi screen, so one dp is one pixel on a 160 dpi screen. The ratio of dp-to-pixel will change with the screen density, but not necessarily in direct proportion. Note: The compiler accepts both "dip" and "dp", though "dp" is more consistent with "sp".
alt definition: Density-independent pixel (dp): A virtual pixel unit that you should use when defining UI layout, to express layout dimensions or position in a density-independent way. The density-independent pixel is equivalent to one physical pixel on a 160 dpi screen, which is the baseline density assumed by the system for a "medium" density screen. At runtime, the system transparently handles any scaling of the dp units, as necessary, based on the actual density of the screen in use. The conversion of dp units to screen pixels is simple: px = dp * (dpi / 160). For example, on a 240 dpi screen, 1 dp equals 1.5 physical pixels. You should always use dp units when defining your application's UI, to ensure proper display of your UI on screens with different densities.
Scale-independent Pixels - this is like the dp unit, but it is also scaled by the user's font size preference. It is recommend you use this unit when specifying font sizes, so they will be adjusted for both the screen density and user's preference.
Screen size: Actual physical size, measured as the screen's diagonal. For simplicity, Android groups all actual screen sizes into four generalized sizes: small, normal, large, and extra large.
Screen density: The quantity of pixels within a physical area of the screen; usually referred to as dpi (dots per inch). For example, a "low" density screen has fewer pixels within a given physical area, compared to a "normal" or "high" density screen. For simplicity, Android groups all actual screen densities into four generalized densities: low, medium, high, and extra high.
Orientation: The orientation of the screen from the user's point of view. This is either landscape or portrait, meaning that the screen's aspect ratio is either wide or tall, respectively. Be aware that not only do different devices operate in different orientations by default, but the orientation can change at runtime when the user rotates the device.
Resolution: The total number of physical pixels on a screen. When adding support for multiple screens, applications do not work directly with resolution; applications should be concerned only with screen size and density, as specified by the generalized size and density groups.
Versions
MinSDK version is specified in the gradle build file
Platform Codenames, Versions, API Levels, and NDK Releases
The code names match the following version numbers, along with API levels and NDK releases provided for convenience:
| Code name | Version | API level |
|---|---|---|
| Lollipop | 5.1 | API level 22 |
| Lollipop | 5.0 | API level 21 |
| KitKat | 4.4 - 4.4.4 | API level 19 |
| Jelly Bean | 4.3.x | API level 18 |
| Jelly Bean | 4.2.x | API level 17 |
| Jelly Bean | 4.1.x | API level 16 |
| Ice Cream Sandwich | 4.0.3 - 4.0.4 | API level 15, NDK 8 |
| Ice Cream Sandwich | 4.0.1 - 4.0.2 | API level 14, NDK 7 |
| Honeycomb | 3.2.x | API level 13 |
| Honeycomb | 3.1 | API level 12, NDK 6 |
| Honeycomb | 3.0 | API level 11 |
| Gingerbread | 2.3.3 - 2.3.7 | API level 10 |
| Gingerbread | 2.3 - 2.3.2 | API level 9, NDK 5 |
| Froyo | 2.2.x | API level 8, NDK 4 |
| Eclair | 2.1 | API level 7, NDK 3 |
| Eclair | 2.0.1 | API level 6 |
| Eclair | 2.0 | API level 5 |
| Donut | 1.6 | API level 4, NDK 2 |
| Cupcake | 1.5 | API level 3, NDK 1 |
| (no code name) | 1.1 | API level 2 |
| (no code name) | 1.0 | API level 1 |
Starting with Cupcake, individual builds are identified with a short build code, e.g. FRF85B.
The first letter is the code name of the release family, e.g. F is Froyo.
The second letter is a branch code that allows Google to identify the exact code branch that the build was made from, and R is by convention the primary release branch.
The next letter and two digits are a date code. The letter counts quarters, with A being Q1 2009. Therefore, F is Q2 2010. The two digits count days within the quarter, so F85 is June 24 2010.
Finally, the last letter identifies individual versions related to the same date code, sequentially starting with A; A is actually implicit and usually omitted for brevity.
The date code is not guaranteed to be the exact date at which a build was made, and it is common that minor variations added to an existing build re-use the same date code as that existing build.
Toast (unobtrusive popup text message)
http://developer.android.com/reference/android/widget/Toast.htmlA toast = view w/little message for user. appears as a floating view over the application. It will never receive focus. The user will probably be in the middle of typing something else. The idea is to be as unobtrusive as possible Two examples are the volume control, and the brief message saying that your settings have been saved.
<RelativeLayout xmlns:android="http://schemas.android.com/apk/res/android"    xmlns:tools="http://schemas.android.com/tools" android:layout_width="match_parent"    android:layout_height="match_parent" android:paddingLeft="@dimen/activity_horizontal_margin"    android:paddingRight="@dimen/activity_horizontal_margin"    android:paddingTop="@dimen/activity_vertical_margin"    android:paddingBottom="@dimen/activity_vertical_margin" tools:context=".MainActivity">

    <TextView android:id="@+id/txtVw1"        android:text="@string/hello_world"        android:layout_width="wrap_content"        android:layout_height="wrap_content" />
</RelativeLayout>
public class MainActivity extends ActionBarActivity {
  @Override  protected void onCreate(Bundle savedInstanceState) {
   super.onCreate(savedInstanceState);
   setContentView(R.layout.activity_main);
   Toast txtMsgToast=
       Toast.makeText(getApplicationContext(), "main activity created", Toast.LENGTH_LONG);
  txtMsgToast.show();
TextView tv1=(TextView)findViewById(R.id.txtVw1); tv1.append("blaaaa");}
=============================================================================
=============================================================================
IDE's
Android is an extremely powerful platform (and open source) for developers!
Eclipse is my favorite IDE!
Others you can run directly from your android device:
JavaIDEdroid is an IDE (integrated development environment) can run on Android
and allows you to natively create Android applications
without the need to use the Android SDK on Mac, Windows or Linux.
JavaIDEdroid comes equipped with an
aapt tool,
compiler for Java,
dx tool,
DexMerger tool,
ApkBuilder,
zipsigner-lib (this library also does the zipalign),
SpongyCastle Library,
BeanShell Interpreter and
JavaRunner, which allows running of any binary Java cmdline apps (.jar file).
Java Editor is a simple Java editor. w/limited functionality
colors syntax nodes, attributes, properties, events and also
supports auto-completion and search and replace.
It can open default files with the extensions jav & java.
Terminal IDE = expandable terminal/cmdline app
for full Java / C / C++ / HTML / Android development kit,
and can be run on any android device.
DroidEdit =text source code editor (similar to Notepad++)
for C, C++, C#, Java, HTML, CSS, Javascript, Python, Ruby, Lua, LaTeX, and SQL.
the premium version with SFTP/FTP, Dropbox, Drive and Box support (great if you are on the move),
custom themes (for those that want to customize everything),
external commands through SSH and root mode.
Syntax highlighted Code Editior supports HTML, CSS, JavaScript, PHP editor, Python, Java, C, C++, CoffeeScript, Haskell, Clojure, and Groovy.
for web developement, but can be used by Java coders.
has stuff like search/replace, undo/redo
Sand IDE Pro for Java ...highlighting for Java, showing line numbers, undo/redo,
and is also a full-featured Java compiler and can run Java programs
with both output and input supported.
supports external bluetooth keyboards
supports CPU architectures (x86, ARM, MIPS) and new tablets have Intel chips.
AIDE – Android IDE
developing real Android apps directly on your Android device.
It comes with interactive coding lessons and step-by-step tutorials for app development and Java programming skills.
You can visually design apps, write code with the editor which can do
code completion,
real-time error checking,
refactoring,
smart code navigation and more.
supports Java/Xml and the Android SDK,
apps with C/C++ and the Android NDK
as well as pure Java console applications.
fully compatible Dropbox
can also open Android Studio projects which follow the default folder structure.
AIDE also supports Git for professional development.
Anacode IDE
supports Java, HTML, CSS, PHP, JavaScript and C/C+
build and run from your android device.
write and test HTML, JavaScript and CSS in the built-in or system browser,
upload to FTP and support Tasks lists too.
Quoda Code Editor
similar to Notepad++, with support for SFTP/FTP(S) servers and cloud storage (Dropbox and Google Drive).
Some of the features include syntax highlighting with
themes,
cross-session editing,
code-completion,
extended keyboard,
downloading source code from URL,
auto-encoding detection,
brace matching,
auto-indentation,
line bookmarking,
colour picker,
HTML formatting
you may have to pay extra for newer or additional features.
languages include: ActionScript, C, C++, C#, CSS, Haskell, HTML, Java, JavaScript, Lisp, Lua, Markdown, Objective-C, Perl, PHP, Python, Ruby, SQL, Visual Basic and XML.
Android Studio
http://developer.android.com/sdk/index.html#top- IDE to build ADK's
- Has a nice gui output display/simulator to see what you are coding.
- Built on IntelliJ.
ADB
Android Debug Bridge (ADB) allows Android Studio running/debugging appson both AVD emulators and physical Android devices
The ADB consists of
a client (cmdline tool "adb" in Android SDK platform-tools dir) also Android Studio also has a built-in client.
a server process running in the background on the development system
a daemon background process running on real Android devices (phones, tablets, etc)
Enabling ADB on Android 5+ phone/tablet devices
Settings -> About
tap on Build number 7 times (until a message appears saying developer mode is enabled)
Config Windows to connect to an Android device using ADB
Install Google USB driver (http://developer.android.com/sdk/win-usb.html)
1. Launch Android Studio -> Tools -> Android -> SDK Manager menu
2. Extras -> ensure Google USB Driver package is listed/installed
For devices not supported by the Google USB driver,
download the manufacturer drivers
http://developer.android.com/tools/extras/oem-usb.html.
When an Android device is attached to a Windows system it is configured as a Portable Device.
the device to connect to ADB must be configured as Android ADB Composite Device.
First, connect the Android device to the computer system if it is not currently connected.
Next, ControlPanel -> DeviceManager -> "Other" Devices.
see if the Android device is listed
Rt-click -> Update Driver Software -> Browse my computer Navigate to USB drivers
Google USB driver will be in Android Studio\sdk\extras\google\usb_driver
the device is now recognized as an Android Composite ADB Interface
verify by runing:
adb devices
List of devices attached
015d41d4454bf80c offline
If device shows offline or unauthorized then Allow USB debugging on the device)
List of devices attached
015d41d4454bf80c device
you may need to restart or update the ADB server:
adb kill-server
adb start-server
android update adb
or reboot the system.
running test app
Launch Android Studio, open the AndroidSample project -> run button (in Studio toolbar)
the Choose running Device for installing and executing the application.
By default, Studio is not configured to detect Android devices as a target testing device.
It is necessary, therefore, to perform some steps in order to be able
to load apps directly onto an Android device from w/in Studio
Google Play Developer Console
https://play.google.com/apps/publish/signup/
apk android app package ...simply files in cetain folder structure
R.java has resource info
build folder has generated srcsrc dir
java has your custom src.java files (such as activities ...interact w/user)
res has
layouts dir (xml files ...u can design_editor drag-n-drop gui)
values dir (name/value pairs such as app name and any dflt app vals)
AndroidManifest.xml (lists app components, required libs, etc
Layouts xml
specifies marginswidth and height
can add textview elements (for displaying text)
Activities
Activities classes extend android.app.Activityhave onCreate method which specifies ContentView(myLayout)
AVD (android virtual device)
emulates real devices (cpu, mem, sound, vid) as gui on your screen testingTOOLS menu - Android - AVD - New (type: phone, tablet, TV)
then specify the system image and android os, and CPU (ARM or x86)
then the min API level (15 is the min for some app features)
Run your app
RUN menu - app - ensure you check "Launch Emulator Options"it also/auto creates bytecode, libs & resources into an APK file (like a zip)
then it starts the AVD emulator, and opens the app it
=============================================================================
Setup Steps
https://developer.android.com/sdk/index.html#top
download Android Studio, Launch the .exe, Follow setup wizard + necessary SDK tools.
ensure JAVA_HOME points to your JDK dir ex:C:\Program Files\Java\jdk1.7.0_21.
The individual tools and other SDK packages are correctly saved outside the Android Studio app dir (per best practices)
For example: \Users\<user>\sdk\or.........: C:\Users\MDockery\AppData\Local\Android\sdk
By default, the Android SDK does NOT include everything you need to start developing.
The SDK separates tools, platforms, and other components into packages soooooooo launch Android SDK (via toolbar) aka SDK Manager.exe in SDK dir root. (Mac/Linux see SDK/tools dir)
get latest tools and Android platform, so
Open Tools dir and select:Android SDK Tools
Android SDK Platform-tools
Android SDK Build-tools (highest version)
Open the first Android X.X folder (the latest version) and select:
SDK Platform
A system image for the AVD emulator (ARM EABI v7a System Image)
Open the Extras directory and select:
Android Support Repository
Android Support Library
Open the Extras directory (for use of Google API's):
Google Repository
Google Play services
Note: available on Android-powered devices w/Google Play Store.
To use these APIs in the Android emulator, you must also install the the Google APIs system image
from the latest Android X.X directory in the SDK Manager.
Click Install (dont close the SDK manager, until downloads are done)
Develop and Run apps!
Debug via adb command (even over bluetooth!)
https://developer.android.com/training/wearables/apps/bt-debugging.html
====================================================================
Troubleshooting
Install ErrorsThe following SDK components were not installed: sys-img-x86-addon-google_apis-google-21
So I Ran the sdk mgr manually
C:\Users\MDockery\AppData\Local\Android\sdk\SDK Manager.exe
...and it seemed to download the sdk's successfully
Also the appdata tools folder has some useful utils such as passing a list parm to android.bat
C:\Users\MDockery\AppData\Local\Android\sdk\tools>android.bat list
Available Android targets:
----------
id: 1 or "android-21"
Name: Android 5.0.1
Type: Platform
API level: 21
Revision: 2
Skins: HVGA, QVGA, WQVGA400, WQVGA432, WSVGA, WVGA800 (default), WVGA854, WXGA720, WXGA800, WXGA800-7in
Tag/ABIs : no ABIs.
----------
...
---------
id: 27 or "7in WSVGA (Tablet)"
Name: 7" WSVGA (Tablet)
OEM : Generic
---------
id: 28 or "10.1in WXGA (Tablet)"
Name: 10.1" WXGA (Tablet)
OEM : Generic
V4 rendering Error


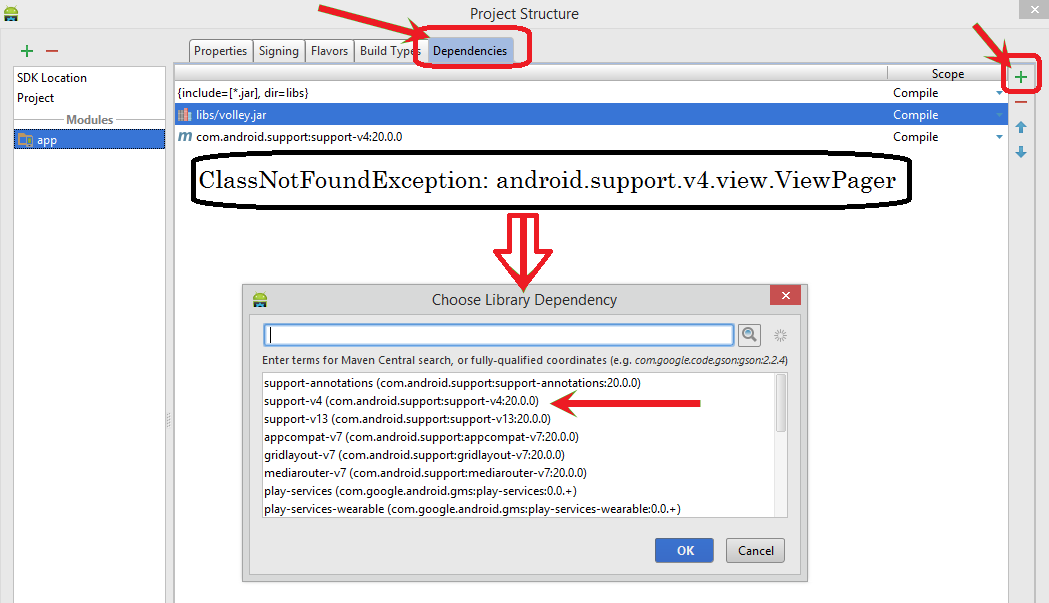
V7 rendering Error

Fixed

When attempting to run your app in an nexus AVD
emulator: ERROR: x86 emulation currently requires hardware acceleration!
Please ensure Intel HAXM is properly installed and usable.
CPU acceleration status: HAX kernel module is not installed!
so run:
C:\Users\MDockery\AppData\Local\Android\sdk\extras\intel\Hardware_Accelerated_Execution_Manager>intelhaxm-android.exe
which said my computer is good for HAXM (Hardward accelerated exe)
but intel hardware virtualization tech VT-x is not turned on in the BIOS
so do that or simply create a new AVD & hardware profile based on the arm processer (which does not need HAXM)
Bluetooth notes:
if you deploy the apk, and the app is stopped, then you may have forgotten to add the permissions to the manifest.xml!...<uses-permission android:name="android.permission.BLUETOOTH" /> <uses-permission android:name="android.permission.BLUETOOTH_ADMIN" /> </manifest>
public class MainActivity extends Activity {
    @Override    protected void onCreate(Bundle savedInstanceState) {
        super.onCreate(savedInstanceState);
        setContentView(R.layout.activity_main);
        Toast.makeText(this, "getting bt adapter", Toast.LENGTH_LONG).show();
        BluetoothAdapter bta=BluetoothAdapter.getDefaultAdapter();
        if(bta==null){
            Toast.makeText(this,"its null",Toast.LENGTH_LONG).show();
        }else{
            Toast.makeText(this,"got it",Toast.LENGTH_LONG).show();
        }
        Toast.makeText(this,"getting previously devs",Toast.LENGTH_SHORT).show();
        Set<BluetoothDevice> pairedDevices = bta.getBondedDevices();
        if (pairedDevices.size() > 0) {
            for (BluetoothDevice device : pairedDevices) {
                Toast.makeText(this, device.getName()  + " " + device.getAddress(), Toast.LENGTH_LONG).show();
            }
        }else{
            Toast.makeText(this, "no previously paried devs", Toast.LENGTH_LONG).show();
        }
    }
Misc BT notes
BluetoothAdapter.getStatenull = device does NOT have it
false = device bt adapter is turned off
put previously paired dev's in array for display
discovery
connection
New Bluetooth Manager
BT smart (aka BT 4.0 low energy)
GATT profile
s2 terminal is a great app
Short and sweet
btSocket=device.createRfcommSocketToServiceRecord(UUID.fromString(rfCommSppUuid)); //client socket used to send
bt.connect();
btSocket.getOutputStream().write("testOut".getBytes());
btServerSocket=bluetoothAdapter.listenUsingRfcommWithServiceRecord("MyServerSock", UUID.fromString(rfCommSppUuid));
public void run(){
InputStream mmInStream=null;
byte[] buffer=new byte[5];
int index=0;
boolean read=false;
try{mmInStream=socket.getInputStream();}catch(IOException e){e.printStackTrace();}
while(true) {//listening to ServerSock InputStream til err
try{if((char)mmInStream.read()==',') read=true; //look for commas?
if(read){int i=mmInStream.available();
while(i>0 && index<5){ //5 char commands?
buffer[index]=(byte)mmInStream.read();
i--; index++;
}
if(index>=4){
String strInput="";
for(int j=0; j<buffer.length; j++) {strInput=strInput+(char)buffer[j];}
System.out.print("READ: "+strInput);
index=0; read=false;
}
}
}catch(IOException e1){e1.printStackTrace();}
try{Thread.sleep(200);}catch(InterruptedException e){e.printStackTrace();}
}
}
Gui/UI
HOLO ...nice
Fragments
Dimension files should be used/reused!
Alternate Layouts
Master/Detail (lefty/righty) wizard
SlidingPaneLayout ...awesome! shows both left and right if it can
ViewPager
ActionBar
Navigation Drawers
ListView
Skia Graphics Lib (SGL) 2D drawing API on Canvas context
OpenGL 3d rendering API
RenderScript Lang + API ...coming soon better than JNI!
Paints
Shaders horizontal span of colors (like fragment shaders)
LinearGradient
RadialGradient
SweepGradient
BitmapGradient
ComposeShader
ColorFilters ...map operation on each pixel
ColorMatrixColorFilter
LightingColorFilter ...darken,lighten, multiply, screen
PorterDuffColorFilter ...chg color of some pixels
xfermodes
Bitmaps
Surface ...drawing pixel buffer
SurfaceView
SurfaceFlinger ...Surface manager
PixelFlinger ...rasterizer
Animation Types
fading
sequences
cross-fading
layout
transforming (translation/rotation/scale)
<translate
android:from...
android:to...
android:duration...
(aka: "is it front or back camera", "output resolutions supported" etc)
2. Setup output targets for image data (pass a surface to camera, as a capture request target)
see: create a capture session w/list of targets in capture request.
Where is camera picture data? ...they are handled by the output target (discussed in step 2)
the camera is the producer and the
targets are the consumer.
The camera keeps enqueuing the picture data, and once the data is available
the consumer will be notified to process them.
SurfaceView (or SurfaceTexture) for preview,
TextureView will turn the picture data into textures, and draw them in it
ImageReader for still picture ...you decide how to process the data.
MediaRecoder for video recording. passes image to codec to compress and then write them out.
3. CameraManager.open(cameraId) gets CameraDevice via onOpened() async callback method
4. Create a CaptureRequest via CameraDevice. captures a single image/frame from the camera device.
We usually don't create a CaptureRequest directly since that would be error prone and tedious,
given the settings for a typical user case, say preview, is almost similar.
Builder pattern is applied here. As shown in the class diagram above, a CaptureRequest.Builder is created from CameraDevice
with a predefined template (createCaptureRequest(CameraDevice.TEMPLATE_PREVIEW)).
Then , we use the builder to set up the stuff that varies.
ex: usually you need to call addTarget(Surface) to set up the output targets for this specific CaptureRequest.
5. Create a CaptureRequestSession from CameraDevice
6. Submit a CaptureRequest to CaptureRequestSession.
Capture() = takes 1 picture
setRepeatingRequest() issues a repeating request to show constand/on-going preview.
(optionally set other settings: ex: auto focus mode, white balance mode, before submitting)
setRepeatingRequest =camera continually captures images at the max rate possible using the one provided CaptureRequest settings
setRepeatingBurst =camera continually captures images at the max rate possible cycling thru LIST of CaptureRequest settings
So, setRepeatingBurst can be used to capture images with a list of different settings.
7. Get Capture Results via CameraCaptureSession.CaptureCallback
...piece by piece in CaptureResult on onCaptureProcessed,
or
you can wait and get them all in TotalCaptureResult on onCaptureComplete. That is the step 8 in the diagram. And, we're done.
basic ex:
public class MainActivity extends Activity {
private final static String TAG = "SimpleCamera";
private TextureView mTextureView = null;
private TextureView.SurfaceTextureListener mSurfaceTextureListner = new TextureView.SurfaceTextureListener() {
...
public void onSurfaceTextureAvailable(SurfaceTexture surface, int width,int height) {
CameraManager manager=(CameraManager) getSystemService(CAMERA_SERVICE);
try{ String cameraId=manager.getCameraIdList()[0]; //get 1st camara
CameraCharacteristics characteristics =manager.getCameraCharacteristics(cameraId);
StreamConfigurationMap map =characteristics.get(CameraCharacteristics.SCALER_STREAM_CONFIGURATION_MAP);
mPreviewSize=map.getOutputSizes(SurfaceTexture.class)[0];
manager.openCamera(cameraId, mStateCallback, null);
}catch(CameraAccessException e){e.printStackTrace();}
}
private CameraDevice.StateCallback mStateCallback=new CameraDevice.StateCallback() {
public void onOpened(CameraDevice camera) {
mCameraDevice = camera;
SurfaceTexture texture = mTextureView.getSurfaceTexture();
if(texture==null){Log.e(TAG, "texture is null"); return; }
texture.setDefaultBufferSize(mPreviewSize.getWidth(), mPreviewSize.getHeight());
Surface surface=new Surface(texture);
try{mPreviewBuilder=mCameraDevice.createCaptureRequest( CameraDevice.TEMPLATE_PREVIEW );
} catch (CameraAccessException e){e.printStackTrace();}
mPreviewBuilder.addTarget(surface);
try{ mCameraDevice.createCaptureSession(Arrays.asList(surface), mPreviewStateCallback, null);
}catch(CameraAccessException e) {e.printStackTrace();}
}
};
private CameraCaptureSession.StateCallback mPreviewStateCallback = new CameraCaptureSession.StateCallback() {
public void onConfigured(CameraCaptureSession session) {
mPreviewSession=session;
mPreviewBuilder.set(CaptureRequest.CONTROL_MODE, CameraMetadata.CONTROL_MODE_AUTO);
HandlerThread backgroundThread=new HandlerThread("CameraPreview");
backgroundThread.start();
Handler backgroundHandler=new Handler(backgroundThread.getLooper());
try{mPreviewSession.setRepeatingRequest(mPreviewBuilder.build(), null, backgroundHandler); //repeat in background
}catch(CameraAccessException e){e.printStackTrace();}
}
};
Skia Graphics Lib (SGL) 2D drawing API on Canvas context
OpenGL 3d rendering API
RenderScript Lang + API ...coming soon better than JNI!
Paints
Shaders horizontal span of colors (like fragment shaders)
LinearGradient
RadialGradient
SweepGradient
BitmapGradient
ComposeShader
ColorFilters ...map operation on each pixel
ColorMatrixColorFilter
LightingColorFilter ...darken,lighten, multiply, screen
PorterDuffColorFilter ...chg color of some pixels
xfermodes
Bitmaps
Surface ...drawing pixel buffer
SurfaceView
SurfaceFlinger ...Surface manager
PixelFlinger ...rasterizer
Animation Types
fading
sequences
cross-fading
layout
transforming (translation/rotation/scale)
<translate
android:from...
android:to...
android:duration...
Typical android camera2 API steps:
1. Start from CameraManager. iterates all cameras available, get cameraId(s). get specified camera device. via CameraCharacteristics.(aka: "is it front or back camera", "output resolutions supported" etc)
2. Setup output targets for image data (pass a surface to camera, as a capture request target)
see: create a capture session w/list of targets in capture request.
Where is camera picture data? ...they are handled by the output target (discussed in step 2)
the camera is the producer and the
targets are the consumer.
The camera keeps enqueuing the picture data, and once the data is available
the consumer will be notified to process them.
SurfaceView (or SurfaceTexture) for preview,
TextureView will turn the picture data into textures, and draw them in it
ImageReader for still picture ...you decide how to process the data.
MediaRecoder for video recording. passes image to codec to compress and then write them out.
3. CameraManager.open(cameraId) gets CameraDevice via onOpened() async callback method
4. Create a CaptureRequest via CameraDevice. captures a single image/frame from the camera device.
We usually don't create a CaptureRequest directly since that would be error prone and tedious,
given the settings for a typical user case, say preview, is almost similar.
Builder pattern is applied here. As shown in the class diagram above, a CaptureRequest.Builder is created from CameraDevice
with a predefined template (createCaptureRequest(CameraDevice.TEMPLATE_PREVIEW)).
Then , we use the builder to set up the stuff that varies.
ex: usually you need to call addTarget(Surface) to set up the output targets for this specific CaptureRequest.
5. Create a CaptureRequestSession from CameraDevice
6. Submit a CaptureRequest to CaptureRequestSession.
Capture() = takes 1 picture
setRepeatingRequest() issues a repeating request to show constand/on-going preview.
(optionally set other settings: ex: auto focus mode, white balance mode, before submitting)
setRepeatingRequest =camera continually captures images at the max rate possible using the one provided CaptureRequest settings
setRepeatingBurst =camera continually captures images at the max rate possible cycling thru LIST of CaptureRequest settings
So, setRepeatingBurst can be used to capture images with a list of different settings.
7. Get Capture Results via CameraCaptureSession.CaptureCallback
...piece by piece in CaptureResult on onCaptureProcessed,
or
you can wait and get them all in TotalCaptureResult on onCaptureComplete. That is the step 8 in the diagram. And, we're done.
basic ex:
public class MainActivity extends Activity {
private final static String TAG = "SimpleCamera";
private TextureView mTextureView = null;
private TextureView.SurfaceTextureListener mSurfaceTextureListner = new TextureView.SurfaceTextureListener() {
...
public void onSurfaceTextureAvailable(SurfaceTexture surface, int width,int height) {
CameraManager manager=(CameraManager) getSystemService(CAMERA_SERVICE);
try{ String cameraId=manager.getCameraIdList()[0]; //get 1st camara
CameraCharacteristics characteristics =manager.getCameraCharacteristics(cameraId);
StreamConfigurationMap map =characteristics.get(CameraCharacteristics.SCALER_STREAM_CONFIGURATION_MAP);
mPreviewSize=map.getOutputSizes(SurfaceTexture.class)[0];
manager.openCamera(cameraId, mStateCallback, null);
}catch(CameraAccessException e){e.printStackTrace();}
}
private CameraDevice.StateCallback mStateCallback=new CameraDevice.StateCallback() {
public void onOpened(CameraDevice camera) {
mCameraDevice = camera;
SurfaceTexture texture = mTextureView.getSurfaceTexture();
if(texture==null){Log.e(TAG, "texture is null"); return; }
texture.setDefaultBufferSize(mPreviewSize.getWidth(), mPreviewSize.getHeight());
Surface surface=new Surface(texture);
try{mPreviewBuilder=mCameraDevice.createCaptureRequest( CameraDevice.TEMPLATE_PREVIEW );
} catch (CameraAccessException e){e.printStackTrace();}
mPreviewBuilder.addTarget(surface);
try{ mCameraDevice.createCaptureSession(Arrays.asList(surface), mPreviewStateCallback, null);
}catch(CameraAccessException e) {e.printStackTrace();}
}
};
private CameraCaptureSession.StateCallback mPreviewStateCallback = new CameraCaptureSession.StateCallback() {
public void onConfigured(CameraCaptureSession session) {
mPreviewSession=session;
mPreviewBuilder.set(CaptureRequest.CONTROL_MODE, CameraMetadata.CONTROL_MODE_AUTO);
HandlerThread backgroundThread=new HandlerThread("CameraPreview");
backgroundThread.start();
Handler backgroundHandler=new Handler(backgroundThread.getLooper());
try{mPreviewSession.setRepeatingRequest(mPreviewBuilder.build(), null, backgroundHandler); //repeat in background
}catch(CameraAccessException e){e.printStackTrace();}
}
};
Include/embed one xml layout inside another
activity_main.xml<?xml version="1.0" encoding="utf-8"?><android.support.design.widget.CoordinatorLayout xmlns:android="http://schemas.android.com/apk/res/android" xmlns:app="http://schemas.android.com/apk/res-auto" xmlns:tools="http://schemas.android.com/tools" android:layout_width="match_parent" android:layout_height="match_parent" android:fitsSystemWindows="true" tools:context="doc.infodoc.com.vidrec.MainActivity">
...
    <include layout="@layout/content_main" />
...
</android.support.design.widget.CoordinatorLayout>
content_main.xml (this layout gets included in the layout above)
<?xml version="1.0" encoding="utf-8"?><RelativeLayout xmlns:android="http://schemas.android.com/apk/res/android"    xmlns:app="http://schemas.android.com/apk/res-auto"    xmlns:tools="http://schemas.android.com/tools"    android:layout_width="match_parent"    android:layout_height="match_parent"    android:paddingBottom="@dimen/activity_vertical_margin"    android:paddingLeft="@dimen/activity_horizontal_margin"    android:paddingRight="@dimen/activity_horizontal_margin"    android:paddingTop="@dimen/activity_vertical_margin"    app:layout_behavior="@string/appbar_scrolling_view_behavior"    tools:context="doc.infodoc.com.vidrec.MainActivity"    tools:showIn="@layout/activity_main">

    <TextView        android:layout_width="wrap_content"        android:layout_height="wrap_content"        android:text="Vid Rec!" />
</RelativeLayout>
Comments
Post a Comment